INTRODUCTION
To make a bentwood box a single plank of wood in which three kerfs (grooves) have been cut, is steamed at each kerf, bent and pegged at the final corner to create the sides of a box. A bottom is made and pegged to the box sides. If a top is required, a lid is rebated to fit.
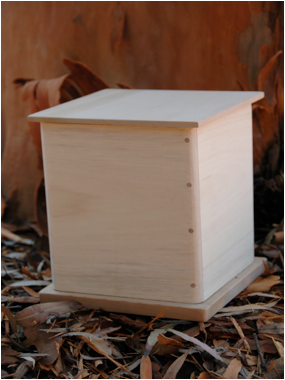
Bending wood this way is possible because the lignin that holds the cells in wood together becomes softer when heated, there-bye making the wood flexible and pliable. Green wood with its moisture content being higher than kiln dried wood, conducts heat more quickly to the centre of the wood and to the lignin. Below is one of my attempts at making a bent box.
Read: :Cedar” by Hilary Stewart.Vancouver, Douglas & McIntyre, 1995.
BEGINNINGS
The First Nation peoples of the Northwest coast of North America were unique in making steamed bentwood boxes from the wood of cedar trees.
Living in an environment that was conducive to the abundant growth of these trees, cedar played an important role in all aspects of their traditional life-style: in constructing dwellings, as a means of travel by canoes, and in manufacturing utilitarian and ceremonial objects.
Cedar was an ideal material for these purposes with its wood, bark, roots and long flexible branches all suitable as a manufacturing resource. In particular the wood of cedar, which is straight grained, light and easily split, was an ideal material.
Bentwood boxes varied in size (those where length was greater than height, were called chests) and decoration, with utilitarian objects less likely to exhibit images or carving.
Boxes performed many functions including storage for food, blankets, ceremonial objects, as a cooking utensil, as carrier and storage for water, as a drum and as burial place for the dead. Boxes and chests made as trade items were more elaborately decorated and/or carved. Chiefs demonstrated their status and wealth through the number and elaborateness of the boxes and chests they possessed.
CREATING
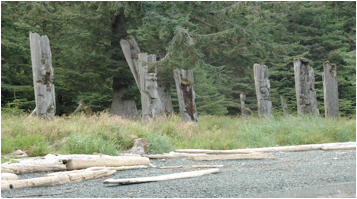
In the early 1970s l lived in Vancouver. That’s when l became fascinated with the culture and cultural artefacts of the First Nation people. Since then l have made many trips to Vancouver and two trips to Haida Gwaii (the Queen Charlotte Islands), the latter including visits to Skedans and Ninstints, sites of past Haida villages, and to stands of old growth spruce and cedar.
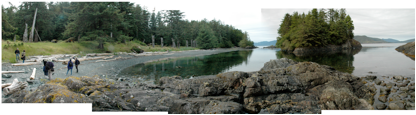
Ninstints: above and below
Having worked with cedar to build canoes and a Catspaw dinghy, it was inevitable that eventually l would be drawn to the challenges of creating cedar steamed bentwood boxes.
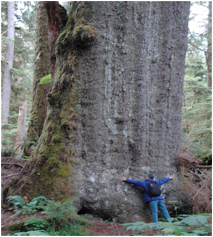 Stand
of giant spruce
Stand
of giant spruce
Process
In making a bentwood box it is very important to cut the kerfs correctly. Hilary Stewart in her book Cedar shows seven types of kerf that were traditionally used.
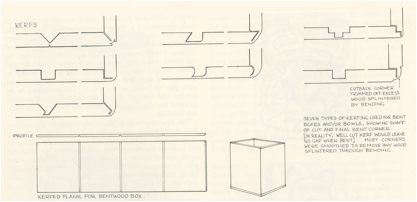
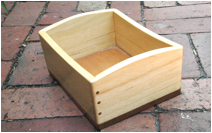
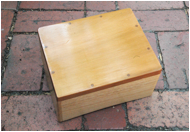
The box in the photographs above, which measures10” x 8” x 5” or 254mm x 203mm x 127mm, has a cedar base and silver ash sides; all timber is ½” or 12.7mm thick. I use either silver ash or cedar to create bentwood boxes. In selecting wood, make sure the grain is fine, parallel and runs down the length of the plank. As shown, the base and fourth corner have been pegged. For this box, V shaped kerfs have been made using a commonly available router bit with a 45° profile. The diagram below (not to scale) shows the measurements and placement of each kerf; take particular note of the extra length between points E and F. This extra length is equivalent to the depth of the rebate at AB and should be accounted for when marking out planks. Also note the depth of the kerfs. In talking with a carver in Vancouver, he recommended leaving, for a 1” thick plank, 1/8” of wood for steaming and bending.
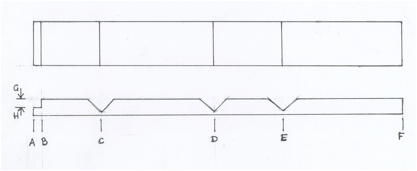
In the diagram above: AC=DE; EF=CD+GH; AB= thickness of plank
In creating the kerfs shown in the next diagram, a Japanese pull saw and bent chisel or crooked knife could be used or, as l have done, a specialised router bit and conventional square router bit can be employed with final undercutting completed using a chisel. The square bit l use has a ½” or 12.7mm base and the specialised bit a ¾” or 19.05mm base. It is important that the depth of groove cut, equals the width of the kerf (with the bits l use, depth = ½”)
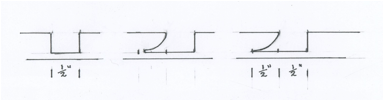
From left: square router bit used; specialised bit used; final under-cutting via chisel
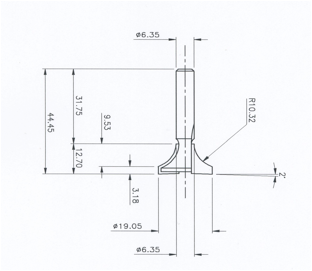
The diagram below details the specifications for the specialised router bit.
Having cut the kerfs, the next step is to steam the kerfs to enable the wood to become pliable enough to bend. It is very important that the steam directed at the kerfs raises the temperature to or near 100°C. The following photos illustrate the set-up of camping stove, kettle and car radiator hose, which achieves this. Holding the hose end with a glove, the steam is directed up and down a kerf and its reverse side. After five minutes the plank is tested to see if it is pliable enough to bend; if not, more steam is applied. When ready, the plank is slowly but firmly bent 45° and held in position using picture-framing clamps. The remaining kerfs are then bent, with the last corner pegged.
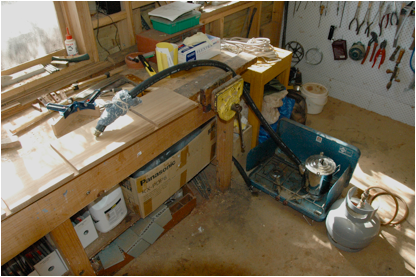
Generating steam via camping stove, kettle and car radiator hose. It’s important to generate heat of 100C onto the kerfs. Cloth at end of hose protects hand against heat generated.
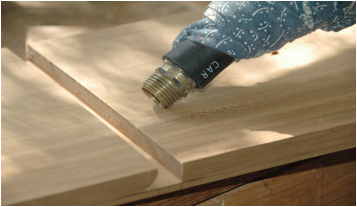
Steaming the kerfs
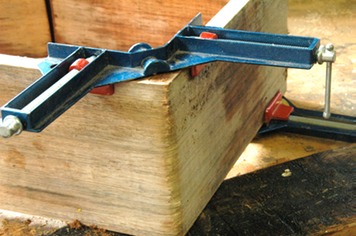
Clamping corners